In the digital age, video editing has become an essential skill for creators of all kinds. DaVinci Resolve, a powerful software known for its comprehensive set of tools, offers professionals and beginners the ability to not only edit videos but also adjust color correction, apply visual effects, and enhance audio. In this article, we will focus specifically on one crucial aspect of video editing – adjusting brightness levels in your videos using DaVinci Resolve. By mastering the techniques outlined in this tutorial, you can effectively enhance the visual impact of your videos, captivate your audience, and elevate the overall quality of your content.
DaVinci Resolve stands out as an all-in-one solution, providing a range of features and capabilities that can accommodate projects of different sizes and complexities. Whether you are a seasoned professional or just starting out, this software offers the tools and resources needed to bring your creative vision to life. Throughout this article, we will explore step-by-step instructions and tips on how to increase and decrease brightness in DaVinci Resolve, allowing you to optimize the visual elements of your videos and craft captivating content that leaves a lasting impression on your viewers.
Understanding DaVinci Resolve

Explanation of DaVinci Resolve
DaVinci Resolve is an all-in-one video editing, color correction, visual effects, and audio post-production software. It is a comprehensive tool that offers a wide range of features for professionals and beginners alike. Whether you are working on a small project or a large-scale production, DaVinci Resolve has the tools you need to achieve your desired results. From editing and color grading to audio mixing and visual effects, this software is designed to enhance and optimize your video content.
Why Use DaVinci Resolve for Brightness Adjustment
When it comes to adjusting brightness levels in your videos, DaVinci Resolve offers a powerful and intuitive platform to get the job done effectively. With its advanced color grading capabilities, you have precise control over the brightness and contrast of your footage. This level of control allows you to enhance the visual impact of your videos, ensuring that every frame looks professional and visually appealing.
The Importance of Mastering Brightness Adjustment
Mastering brightness adjustment is essential in achieving the desired look and feel for your videos. Whether you want to create a bright and vibrant scene or a moody and atmospheric ambiance, proper brightness adjustment is key. It helps set the tone, convey emotions, and guide the viewer’s focus. By understanding the techniques and tools available in DaVinci Resolve for brightness adjustment, you can elevate the quality of your videos and create a more immersive experience for your audience.
Basic Features of DaVinci Resolve
Overview of the User Interface
The user interface of DaVinci Resolve is designed to provide a smooth and efficient workflow. It consists of various panels and tabs that allow you to access different functionalities of the software. The main window is divided into sections such as the media pool, timeline, viewer, and color grading panel. Familiarizing yourself with the user interface is essential to navigate through the software and utilize its features effectively.
Understanding the Timeline and Playback Features
The timeline in DaVinci Resolve is where you arrange and edit your video clips. It allows you to trim, cut, and merge clips to create a seamless sequence. The playback features, such as scrubbing, jogging, and frame-by-frame navigation, allow you to preview your edits and make precise adjustments. Understanding how to use the timeline and playback features efficiently will streamline your editing process and help you achieve your desired results.
Introduction to the Color Grading Panel
The color grading panel in DaVinci Resolve is where you can make adjustments to the color, brightness, and contrast of your footage. It provides a comprehensive set of tools and controls, such as lift, gamma, gain, and curves, to fine-tune the look of your videos. The color grading panel is essential for achieving accurate and pleasing color representation, which includes controlling the brightness levels. Familiarizing yourself with the color grading panel will empower you to make precise brightness adjustments and enhance the overall visual quality of your videos.
Preliminary Steps before Brightness Adjustment
Importing Your Video into DaVinci Resolve
Before you can adjust the brightness of your video, you need to import it into DaVinci Resolve. To do this, you can either drag and drop your video files into the media pool or use the import function within the software. Once imported, your video will be available for editing and color grading.
Selective Clipping of Your Video
To ensure that your brightness adjustment only affects specific parts of your video, you can use the selective clipping feature in DaVinci Resolve. This allows you to define regions or masks within your footage where the adjustment will be applied. By selectively clipping your video, you have better control over the areas that need brightness adjustment, enhancing your ability to create a more balanced and visually pleasing result.
Positioning On Timeline
After importing your video into DaVinci Resolve, you need to position it on the timeline. This involves arranging the video clips in the desired sequence, trimming unnecessary parts, and ensuring a smooth transition between scenes. Proper positioning on the timeline ensures that you have a clear overview of your video and facilitates easy accessibility when making brightness adjustments.
Brightness and Contrast in DaVinci Resolve
Understanding Brightness and Contrast
Brightness and contrast are fundamental elements of visual composition and play a crucial role in creating the desired look and feel of your videos. Brightness refers to the overall amount of light in an image, while contrast refers to the difference between the lightest and darkest parts of an image. By mastering the manipulation of brightness and contrast in DaVinci Resolve, you can effectively enhance the visual impact and mood of your videos.
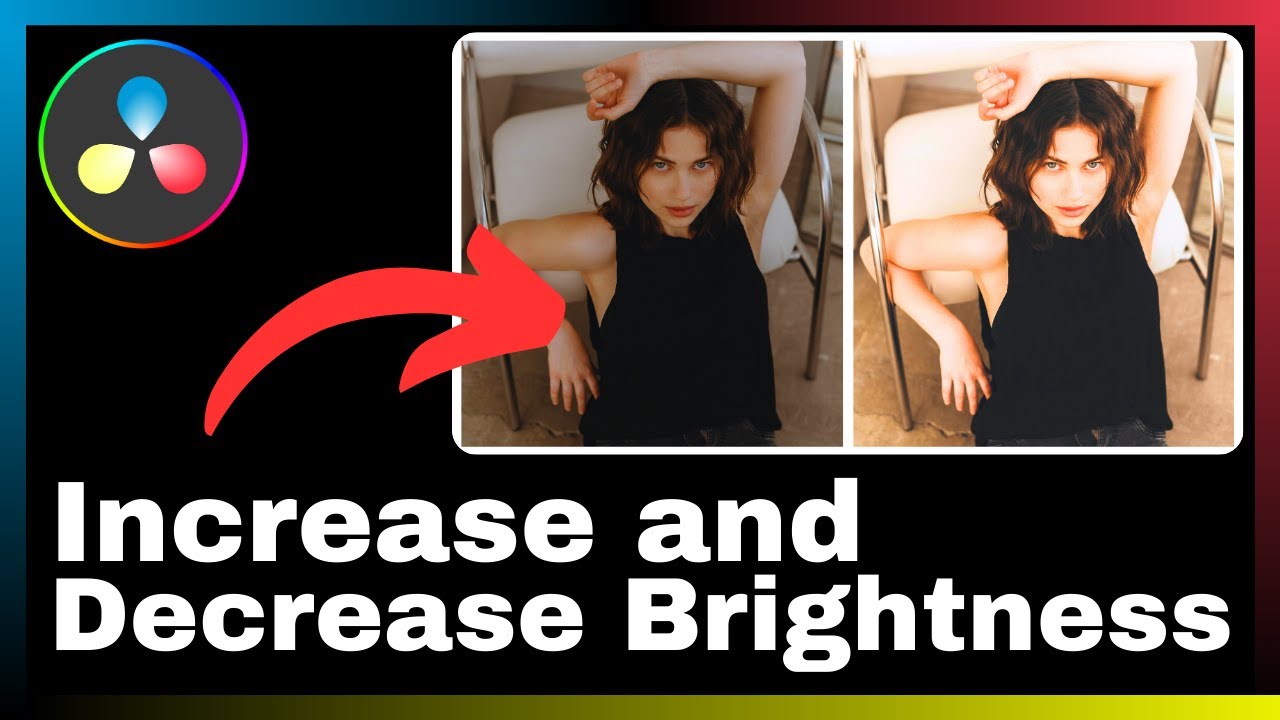
Effects of Increasing and Decreasing Brightness
Increasing the brightness of a video can make it appear more vibrant, energetic, and inviting. It can highlight important details and create a sense of positivity and warmth. On the other hand, decreasing the brightness can evoke a more moody, mysterious, or dramatic atmosphere. It can emphasize shadows, add depth to the image, and create a sense of tension or melancholy. Understanding the effects of increasing and decreasing brightness will enable you to make informed creative choices when adjusting the brightness levels in your videos.
Interplay Between Brightness and Contrast
Brightness and contrast are closely interconnected, and changes to one can influence the other. Increasing the brightness of a video can also affect the perceived contrast, making the image appear flatter or washed out. On the contrary, decreasing the brightness can intensify the contrast, making the highlights and shadows more distinct. Finding the right balance between brightness and contrast is essential to ensure that your videos have the desired visual impact and maintain a natural and pleasing appearance.
Increasing Brightness Using DaVinci Resolve
Navigating to the Color Panel
To increase the brightness of your video in DaVinci Resolve, you need to access the color grading panel. This can be done by selecting the appropriate tab or panel within the user interface. Once you have navigated to the color panel, you will have access to various tools and controls for adjusting the brightness of your footage.
Adjusting the Lift, Gamma, and Gain Controls
Within the color grading panel, you will find the lift, gamma, and gain controls, which are essential for adjusting the brightness. The lift control affects the shadows and darker areas of the image, the gamma control adjusts the mid-tones, and the gain control alters the highlights and brighter areas. By manipulating these controls, you can achieve the desired level of brightness in your video.


Using the Brightness Slider to Increase Brightness
In addition to the lift, gamma, and gain controls, DaVinci Resolve provides a dedicated brightness slider that allows you to make quick and straightforward adjustments to the brightness of your footage. By dragging the slider to the right, you can increase the brightness, instantly seeing the changes in real-time. This slider provides a simplified approach to brightness adjustment, ideal for quick edits or initial adjustments.
Previewing and Comparing Changes
Previewing the changes you make to the brightness of your video is essential to ensure that you achieve the desired result. DaVinci Resolve offers real-time previewing, allowing you to see the impact of your brightness adjustments immediately. Additionally, you can compare the before and after versions of your video to assess the effectiveness of your changes. Previewing and comparing changes enables you to make informed decisions and fine-tune your brightness adjustments.
Decreasing Brightness Using DaVinci Resolve
Locating the Appropriate Controls
To decrease the brightness of your video in DaVinci Resolve, you can utilize the same controls available for increasing brightness. By accessing the color grading panel, you can adjust the lift, gamma, and gain controls or use the brightness slider to make the necessary changes. The familiarity and consistency of the controls in DaVinci Resolve simplify the process of decreasing brightness.
Lowering Brightness Using the Brightness Slider
Just like when increasing brightness, you can also use the dedicated brightness slider in DaVinci Resolve to lower the brightness of your video. By dragging the slider to the left, you can decrease the brightness, instantly seeing the impact on your footage. This slider provides a quick and user-friendly way to make adjustments and achieve the desired level of brightness.
Monitoring Your Changes
As you make adjustments to the brightness of your video, it is crucial to monitor the changes to ensure that the overall look and feel align with your creative vision. DaVinci Resolve provides various monitoring options, such as full-screen playback, split-screen comparison, or viewing on external displays. By monitoring your changes, you can make precise adjustments and maintain consistency throughout your video.
Practical Tips for Decreasing Brightness Effectively
Decreasing the brightness of your video requires careful consideration to achieve the desired result. Here are some practical tips to help you decrease brightness effectively in DaVinci Resolve:
-
Start with subtle adjustments: Begin by making small changes to the brightness and evaluating the impact on your video. Gradually decrease the brightness until you achieve the desired effect.
-
Consider the mood and atmosphere: Lowering the brightness can create a range of moods and atmospheres. Think about the emotions or ambiance you want to convey and adjust the brightness accordingly.
-
Take note of details and shadows: When decreasing brightness, pay attention to the details and shadows in your video. Ensure that important elements are not lost in darkness and that the shadows enhance the overall composition.
-
Use selective clipping or masking: If you only want to decrease the brightness in specific areas of your video, utilize the selective clipping or masking features in DaVinci Resolve. This will allow you to target specific regions while maintaining the desired brightness levels in other parts of the footage.
-
Test different adjustments: Experiment with various settings and techniques to find the optimal balance of brightness for your video. DaVinci Resolve provides a wide range of controls and options, so take the time to test and refine your adjustments.
Understanding the Impact of Brightness Changes
Identifying Overexposed Portions
Making changes to the brightness of your video can potentially result in overexposed portions, where the highlights or brighter areas become too bright and lose detail. It is important to identify these overexposed portions and make additional adjustments to preserve the details and ensure a balanced visual representation. DaVinci Resolve provides various tools, such as the highlight recovery feature or adjusting the gain control, to help you manage overexposed portions effectively.
Correlating Brightness Adjustment with Mood Changes in Video
Brightness adjustments have a significant impact on the mood and atmosphere of your videos. By correlating brightness adjustments with the intended mood changes, you can create a more powerful and engaging narrative. Increase the brightness for energetic and lively scenes, while decreasing it for moments of suspense or melancholy. By carefully considering the relationship between brightness and mood, you can enhance the overall storytelling experience in your videos.
Balancing Brightness with Other Color Grading Elements
Brightness adjustment is just one aspect of the color grading process in DaVinci Resolve. It is essential to balance the brightness with other elements, such as contrast, saturation, and hues, to achieve a cohesive and visually appealing result. Consider how changes in brightness may affect the overall color composition and adjust the other color grading elements accordingly. Achieving a harmonious balance between all color grading elements will elevate the visual impact of your videos.
Advanced Techniques for Brightness Control
Utilizing Grading Modes for Selective Brightness Control
DaVinci Resolve offers various grading modes that allow you to apply different adjustments to specific parts of your video. These modes include qualifiers, power windows, and tracking. By utilizing these grading modes, you can have greater control over the brightness adjustments, selectively targeting specific areas or objects within your footage. This advanced technique enables you to fine-tune the brightness to perfection and achieve a more refined visual presentation.
Understanding the Role of Curves in Brightness Adjustment
Curves are a powerful tool in DaVinci Resolve for adjusting the brightness, contrast, and tonal range of your footage. By manipulating the curves, you can have precise control over the distribution of brightness values in your video. Increasing or decreasing certain points on the curve can selectively adjust the brightness of different parts of the image. Understanding and mastering the use of curves will expand your capabilities in brightness adjustment and provide more creative possibilities.
Using Masks for Localized Brightness Changes
Masks in DaVinci Resolve allow you to isolate specific areas of your video for targeted adjustments. This includes localized brightness changes. By using masks, you can increase or decrease the brightness in specific regions while maintaining the overall balance of the footage. Masks are particularly useful when you want to enhance or suppress certain elements without affecting the rest of the video. By combining masks with other grading techniques, you can achieve precise and intricate brightness adjustments.
Common Mistakes in Brightness Adjustment in DaVinci Resolve
Overcompensation in Brightness Adjustment
One common mistake when adjusting brightness in DaVinci Resolve is overcompensation. This occurs when you make excessive changes to the brightness, resulting in an unnatural or unbalanced look. It is important to approach brightness adjustment with subtlety and make incremental changes to avoid overcompensation. By assessing the impact of each adjustment and maintaining a balanced visual representation, you can achieve a professional and visually pleasing result.
Disregarding Interplay with Other Color Elements
Another mistake to avoid is disregarding the interplay between brightness adjustment and other color elements in your video. Brightness does not exist in isolation but interacts with contrast, saturation, hues, and other color grading elements. Failing to consider the impact of brightness adjustment on these elements can lead to inconsistent or inharmonious visuals. Always evaluate the overall color composition and make adjustments accordingly to ensure a cohesive and balanced result.
Inefficient Use of DaVinci Resolve Tools
DaVinci Resolve provides a wide range of tools and controls for brightness adjustment, and it is essential to utilize them efficiently. Failing to understand the functionalities and capabilities of these tools can hinder your ability to achieve the desired brightness levels. Take the time to explore and learn about the various tools available in DaVinci Resolve and practice their application. Efficient use of the software will enhance your productivity and enable you to achieve professional-grade brightness adjustments.
Conclusion
Summary of Key Points
DaVinci Resolve is a comprehensive video editing, color correction, visual effects, and audio post-production software that offers a wide range of tools for professionals and beginners alike. Understanding how to adjust the brightness levels in your videos using DaVinci Resolve can significantly enhance the visual impact and mood of your content. It is important to master the basic features of DaVinci Resolve, including the user interface, timeline, playback features, and color grading panel. Preliminary steps, such as importing your video, selective clipping, and positioning on the timeline, set the foundation for effective brightness adjustments.
Increasing or decreasing the brightness of your video can have a profound effect on the overall look and feel. It is crucial to understand the interplay between brightness and contrast, as well as the impact on the mood and atmosphere of your videos. DaVinci Resolve provides various tools and techniques for brightness control, such as adjusting the lift, gamma, and gain controls, using the brightness slider, and making advanced adjustments with grading modes, curves, and masks. Avoiding common mistakes, such as overcompensation and disregarding other color elements, will ensure a professional and visually pleasing result.
Significance of Skillful Brightness Adjustment
Mastering brightness adjustment in DaVinci Resolve is essential to enhance the quality of your videos and create a more immersive experience for your audience. Proper brightness control sets the tone, conveys emotions, and guides the viewer’s focus. Skillful brightness adjustment can elevate the storytelling, create a more engaging narrative, and make your videos visually appealing. It is a valuable skill that allows you to achieve the desired look and feel of your videos and distinguish your content from others.
Encouragement to Experiment with Other Features of DaVinci Resolve
While this article focuses on brightness adjustment, DaVinci Resolve offers a wealth of other features and functionalities that can further enhance your videos. Experimenting with these features, such as audio post-production, visual effects, and advanced editing techniques, can take your video content to the next level. By exploring and honing your skills in different aspects of DaVinci Resolve, you can expand your creative possibilities and create more impactful and captivating videos.