“How To Save Project In Canva” is a comprehensive video tutorial created by Media Magnet Guide that aims to help you properly save your Canva projects. In this tutorial, you will learn step-by-step instructions on saving your work in various formats, such as PDFs and PNGs, as well as creating templates for efficient repetitive tasks, like designing YouTube Thumbnails. The video demonstrates where the saving function is located within Canva and explores the different file types you can choose from, including PNG, JPEG, JPG, and PDF. It also provides insights into additional settings and options available to enhance your printing quality and optimize your designs. The tutorial concludes by explaining the concept of saving templates, which allows you to modify certain elements while preserving the template’s original structure. If you have any questions or need further clarification, the video encourages you to leave a comment and requests that you subscribe to the channel for more valuable content.

Understanding Canva
About Canva
Canva is a design platform that allows individuals to create and customize various types of visual content. Whether you’re looking to design graphics for social media, presentations, or print materials, Canva offers a wide range of templates and tools to make the process quick and easy. Available in 100 languages and accessible on any device, Canva is designed to help you express your ideas, unleash your creativity, and achieve your goals.
Why use Canva
Canva provides a user-friendly interface and a wide selection of templates, making it accessible to both beginners and experienced designers. With Canva, you don’t need to have extensive design skills or access to expensive design software to create professional-looking graphics. The platform offers a range of features, including customizable templates, fonts, colors, and shapes, allowing you to personalize your designs to suit your specific needs. Additionally, Canva’s collaboration and sharing capabilities make it easy to work with others and distribute your designs.
Capabilities of Canva
Canva offers a range of capabilities that make it a versatile tool for various design needs. Some of the key features include:
- Templates: Canva provides a vast collection of templates for different types of design projects, such as social media posts, presentations, posters, and more. These templates are pre-designed and can be customized to fit your branding or creative vision.
- Design elements: Canva offers a wide variety of design elements, including fonts, colors, shapes, illustrations, and images. These elements can be combined and manipulated to create unique and visually appealing designs.
- Collaboration: Canva allows teams to collaborate on projects in real-time, making it easy to work together and share ideas. Team members can leave comments, make edits, and track changes, ensuring seamless collaboration throughout the design process.
- Sharing: With Canva, you can easily share your designs with others. You can invite collaborators to view or edit your project, or you can publish your designs directly to social media platforms, websites, or other digital channels.
- Printing: Canva also offers printing services, allowing you to order prints of your designs directly from the platform. This is particularly useful for designs intended for physical materials, such as posters, flyers, or business cards.
Overall, Canva provides a comprehensive set of tools and features that empower users to create professional-looking designs without the need for advanced design skills or expensive software.
Creating a Canva Account
Steps to create a Canva account
To create a Canva account, follow these steps:
- Go to the Canva website.
- Click on the “Sign up” button.
- Choose to sign up with your email address or through your Google or Facebook account.
- Fill in the required information, such as your name, email address, and password.
- Click on the “Get started” button.
- You will then be directed to your Canva dashboard, where you can start creating your designs.
Benefits of having a Canva account
Having a Canva account offers several benefits:
- Access to more features: With a Canva account, you gain access to additional features and tools that may not be available to non-registered users. These features can enhance your design capabilities and allow for a more personalized experience.
- Save and retrieve designs: By creating an account, you can save your designs and access them from anywhere at any time. This makes it convenient to revisit and make changes to your projects.
- Collaboration options: With a Canva account, you can easily collaborate with team members or clients. You can invite them to view or edit your designs, making it easier to work together on a shared project.
- Sync across devices: Having a Canva account allows you to sync your designs across different devices. This means you can start a project on your computer and continue working on it later using your smartphone or tablet.
- Design organization: With a Canva account, you can organize your designs into folders and categories, making it easier to locate and manage your projects.
Creating a Canva account is quick and simple, and it provides a range of benefits that enhance your design experience and workflow.
Navigating the Canva Interface
The Canva dashboard
Once you have logged into your Canva account, you will be greeted with the Canva dashboard. The dashboard serves as a central hub where you can access and manage your designs. Here are some key features of the Canva dashboard:
- Search Bar: Located at the top of the dashboard, the search bar allows you to search for specific templates, elements, or designs within Canva’s extensive library.
- Templates: The dashboard displays a selection of templates that you can choose from to start your design project. These templates are organized into different categories, such as social media, presentations, marketing materials, and more.
- Your Designs: This section displays the designs you have created or worked on recently. You can easily access and edit these designs by clicking on the thumbnails.
- Folders: Canva allows you to organize your designs into folders for easier management. The folders section on the dashboard provides quick access to these organized design folders.
- Team Activity: If you are part of a Canva team or working collaboratively on a project, the team activity section displays recent updates, comments, and changes made by team members.
- Create a Design: At the top-right corner of the dashboard, you will find the “Create a design” button. This button allows you to start a new design from scratch or based on a specific template or dimension.
The Canva dashboard provides a user-friendly and intuitive interface that allows you to navigate through different sections and access the various tools and features offered by Canva.
Exploring the Canva tools and features
Canva offers a range of tools and features to help you create and customize your designs. Here are some key tools and features you can find within Canva:
- Text Tool: The text tool allows you to add and customize text elements within your designs. You can choose from a variety of fonts, sizes, colors, and alignment options to create visually appealing text.
- Image and Video Upload: Canva enables you to upload your own images and videos to use in your designs. This is useful if you want to include custom images or if you want to incorporate branded content into your designs.
- Shape and Line Tools: Canva provides a collection of shapes and lines that you can add to your designs. These shapes and lines can be customized to fit your design needs, and they can be used for decorative or illustrative purposes.
- Backgrounds and Filters: You can easily change the background of your design or apply filters to enhance the visual appeal of your images. Canva provides a variety of pre-designed backgrounds and filters that you can choose from.
- Elements and Icons: Canva offers a vast collection of design elements and icons that you can add to your projects. These elements and icons can be customized to match your design style and branding.
- Layers: The layers feature in Canva allows you to arrange elements within your design and control their stacking order. This is particularly useful when working with multiple elements or when you want to apply effects to specific layers.
- Undo/Redo: Canva provides an undo/redo feature that allows you to easily revert changes or redo them if needed. This helps to streamline your design process and ensures that you can experiment and make changes without fear of losing your progress.
These are just a few of the key tools and features available within Canva. Exploring the platform and experimenting with different tools will allow you to discover the full range of capabilities that Canva offers for your design projects.
Starting a Design Project in Canva
Choosing a Canva template
When starting a design project in Canva, you have the option to begin with a blank canvas or choose from a wide selection of templates. Templates provide a starting point for your design and can save you time and effort by providing a pre-designed layout that you can customize to fit your needs. Here’s how to choose a Canva template for your project:
- Go to the Canva dashboard and click on the “Create a design” button.
- You will be presented with a list of popular design categories, such as social media, presentations, marketing materials, and more. Click on the category that best fits your project.
- Within the chosen category, you will see a variety of template options. These templates are pre-designed layouts that you can use as a starting point. Scroll through the options until you find a template that catches your eye.
- Click on the template to open it in the Canva editor. From here, you can customize the template to fit your design requirements.
- If you decide to start with a blank canvas instead of a template, click on the “Custom dimensions” button on the top-right corner of the template selection screen. This allows you to define your own dimensions and create a design from scratch.
Choosing a Canva template provides you with a foundation for your design and can help spark ideas and creativity. Templates can be customized extensively, allowing you to add your own content, change colors and fonts, and rearrange elements to make the design your own.
Customizing the Canva template
Once you have selected a Canva template, it’s time to customize it to fit your specific design needs. Here are some key steps to follow when customizing a Canva template:
- Adding text: Click on the text element within the template to edit its content. You can change the font, size, color, alignment, and other formatting options to match your design aesthetics. You can also add additional text elements by using the text tool from the toolbar.
- Uploading images or videos: If the template includes image or video elements, you can replace them with your own files. Click on the image or video element within the template, then choose the “Uploads” tab from the sidebar to upload your files. You can also explore Canva’s library of stock images and videos to find suitable visuals for your design.
- Modifying colors and fonts: Canva allows you to change the colors and fonts used in a template to match your branding or personal preferences. Click on the color or font element within the template, then select a new color or font from the options provided. You can also customize the colors and fonts used throughout the entire design by using the “Colors” and “Text Styles” panels in the sidebar.
- Rearranging elements: If you want to change the layout or arrangement of elements within the template, you can easily do so in Canva. Click on an element to select it, then use the drag-and-drop feature to move it to a new position. You can also adjust the size and rotation of elements by using the handles provided.
- Adding or removing elements: Canva templates often include additional elements that can be removed or added as needed. To remove an element, simply click on it and press the delete key on your keyboard. To add a new element, click on the element type you want to add from the toolbar, and then drag it onto the canvas.
Customizing a Canva template allows you to make it unique and tailored to your specific design vision. By following these steps, you can transform a template into a personalized design that meets your needs and reflects your style.
Designing with Canva Tools and Features
Using colors, fonts, and shapes in Canva
Canva provides a wide range of options for customizing the colors, fonts, and shapes within your designs. Here’s how to use these tools effectively:
- Colors: Canva allows you to select colors from a color wheel, input specific color codes, or choose from a variety of pre-selected color palettes. To change the color of an element, select it, then click on the color picker tool in the toolbar. Experiment with different color combinations to achieve the desired look and feel for your design.
- Fonts: Canva offers a large selection of fonts to choose from. You can browse through different font categories or search for specific fonts using the search bar within the text tool. To change the font of a text element, select it, then choose a new font from the font dropdown menu. Be mindful of font legibility and choose fonts that align with the overall style and tone of your design.
- Shapes: Canva provides a variety of shapes that you can add to your designs. These shapes can be used as decorative elements or as containers for text and images. To add a shape, click on the shapes tool in the toolbar, then select the desired shape. You can resize, rotate, and adjust the color and transparency of shapes to suit your design needs.
By utilizing the color, font, and shape tools in Canva, you can create visually appealing designs that align with your branding or creative vision.
Working with layers in Canva
Canva’s layering feature allows you to arrange elements within your design and control their stacking order. Here’s how to work with layers effectively:
- Selecting and deselecting layers: To select a layer, simply click on it within the design canvas. Selected layers will be outlined, indicating that they are active. You can select multiple layers by holding down the Shift key and clicking on additional layers. To deselect a layer, click on any empty area within the canvas.
- Arranging layers: You can change the stacking order of layers by moving them up or down within the layer panel. To move a layer up or down, click and drag the layer to the desired position. The layer that appears at the top of the layer panel will be displayed in front of other layers.
- Grouping layers: Canva allows you to group multiple layers together for easier management. To group layers, select the layers you want to group, then right-click and choose the “Group” option. This can be particularly useful when working with complex designs or when you want to apply effects or transformations to multiple layers at once.
- Locking layers: If you want to prevent accidental edits to a layer, you can lock it. Locked layers cannot be modified or selected, ensuring that you don’t inadvertently make changes to important elements. To lock a layer, select it, then click on the lock icon in the layer panel.
- Hiding layers: Canva allows you to hide layers that you don’t want to be visible in the design canvas. This can be useful when working with multiple elements or when you want to focus on specific areas of your design. To hide a layer, click on the eye icon in the layer panel.
By utilizing Canva’s layering feature, you can have more control over the arrangement and organization of elements within your designs. This allows for greater flexibility and precision in your design process.
Understanding the ruler and grids in Canva
Canva provides rulers and grids to assist with alignment and positioning of elements within your designs. Here’s how to use them effectively:
- Rulers: Canva offers horizontal and vertical rulers that can be toggled on or off. To toggle the rulers, go to the “View” menu and select the “Show rulers” option. The rulers will then appear along the edges of the design canvas. The rulers provide measurements in pixels, helping you maintain consistency and precision in your designs.
- Grids: Canva offers a grid system that can be enabled to assist with alignment and composition. To toggle the grid, go to the “View” menu and select the “Show grid” option. The grid will then be displayed as a series of intersecting lines. The grid provides visual reference points that can aid in aligning and positioning elements within your design.
By utilizing the rulers and grids in Canva, you can ensure that your designs are well-aligned and visually balanced. This can help create a more professional and cohesive look for your projects.
Locating the Share Button in Canva
Position of Share button in Canva
The Share button in Canva is discreetly located within the interface. To locate the Share button, follow these steps:
- Once you have completed your design and are ready to share or download it, locate the Publish/Download button at the top-right corner of the Canva toolbar.
- Click on the Publish/Download button to open the publishing menu.
- Within the publishing menu, you will find the Share button. It is typically located below the Download section.
The placement of the Share button makes it easily accessible when you are ready to share your design or access sharing options in Canva.
Functions of the Share button
The Share button in Canva provides a range of functions related to sharing and collaborating on your designs. Here are some of the key functions of the Share button:
- Sharing with others: The Share button allows you to share your designs with others. You can generate a shareable link that can be sent to collaborators, clients, or anyone else you want to share your design with. This allows others to view and comment on your design without needing a Canva account.
- Collaboration: In addition to sharing, the Share button enables collaboration on your design project. You can invite others to edit or contribute to your design by granting them access through the sharing options. This facilitates teamwork and makes it easier to work together on a project.
- Real-time updates: When collaborating on a shared design, Canva provides real-time updates. This means that any changes made by collaborators will be reflected in the shared document, allowing everyone involved to see the changes as they happen.
- Privacy settings: The Share button also allows you to adjust the privacy settings of your design. You can choose to make the design public, private, or accessible only to specific individuals. This gives you control over who can view or edit your design.
By utilizing the functions of the Share button, you can easily share your designs with others, collaborate effectively, and maintain control over the privacy of your work.
How to Save Your Design in Canva
Steps to save your design
Saving your design in Canva is a straightforward process. To save your design, follow these steps:
- Once you have completed your design, click on the Publish/Download button at the top-right corner of the Canva toolbar. This will open the publishing menu.
- Within the publishing menu, you will find the Save button. Click on the Save button to initiate the saving process.
- Canva will prompt you to enter a name for your design. Enter a descriptive name or title that will help you identify the design later.
- After entering the name, click on the Save button to save your design.
Once the save process is complete, your design will be saved to your Canva account. You can access and retrieve the design at any time from your Canva dashboard.
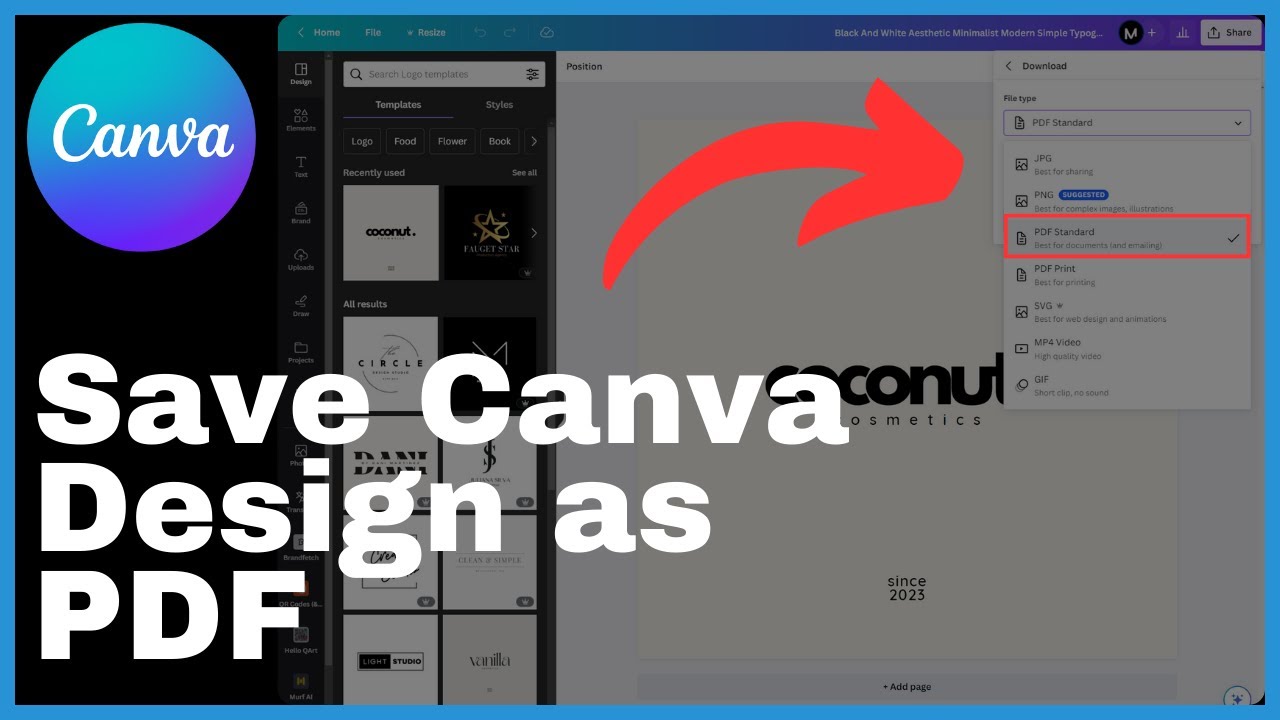
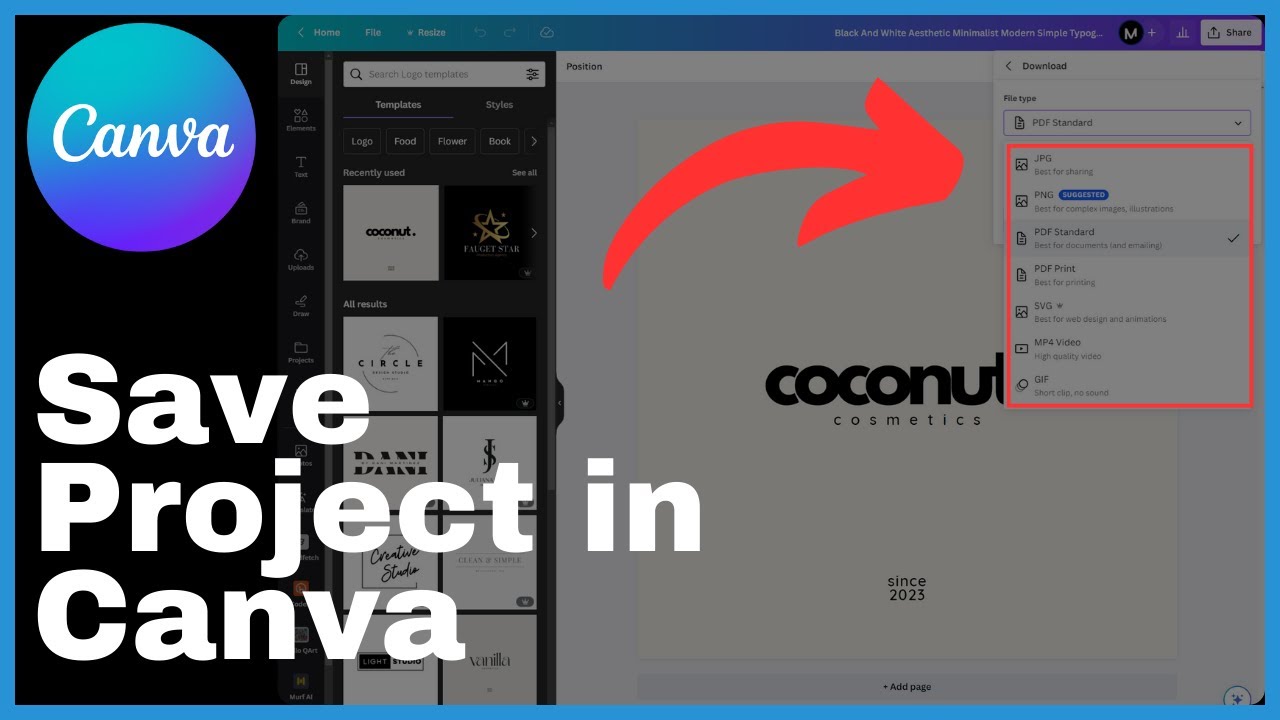
Choosing the save format (.PNG, .JPEG, .JPG, .PDF)
When saving your design in Canva, you have the option to choose from different file formats. Canva supports several popular file formats, including:
- PNG: The PNG format is ideal for designs that contain transparent backgrounds or need to preserve high image quality. This format is commonly used for web graphics or designs that require transparency.
- JPEG/JPG: The JPEG format is commonly used for images with complex or detailed visuals. It offers a good balance between image quality and file size, making it suitable for a variety of design purposes.
- PDF: The PDF format is often used for designs that need to be printed or shared in a document format. PDF files are versatile and can retain the layout and formatting of the design across different devices and platforms.
When saving your design, consider the purpose and requirements of the design to determine the most suitable file format. Canva provides the flexibility to choose the format that best suits your needs.
Understanding the additional save settings in Canva
Canva offers additional save settings that allow you to customize the saving process. These settings can be accessed through the publishing menu when saving your design. Here are some additional save settings in Canva:
- File type optimization: Canva provides the option to optimize the file size of your design. This can be particularly useful when sharing or uploading large files. By enabling the file type optimization setting, Canva will compress the design file to reduce its size while maintaining the overall quality.
- Include crop marks and bleed: Canva allows you to include crop marks and bleed in your design when saving as a PDF. Crop marks are reference marks that indicate where the design should be trimmed, while bleed is the extension of the design beyond the trimmed edges. Including crop marks and bleed is beneficial when preparing a design for printing, as it ensures accurate trimming and prevents white borders around the printed design.
These additional save settings provide further flexibility and customization options when saving your designs in Canva. They allow you to optimize the file size and ensure accurate printing, depending on your specific requirements.
Using Canva for Printing Purposes
Optimizing print quality with Canva
Canva offers a range of tools and features that can help optimize the print quality of your designs. Here are some tips for achieving high-quality prints using Canva:
- Use high-resolution images: When designing for print, it’s important to use high-resolution images to ensure clear and crisp prints. Canva allows you to upload your own high-resolution images or choose from their library of stock images.
- Pay attention to image and text placement: When designing for print, make sure that important elements such as images and text are placed within the safe zone. The safe zone is the area that is least likely to be trimmed during the printing process. Keeping key elements within the safe zone helps to ensure that they will not be cut off or distorted.
- Check the color mode: Canva defaults to RGB color mode, which is suitable for digital designs. However, when designing for print, it is important to switch to CMYK color mode. CMYK is the color mode used by printers and ensures accurate color reproduction in print.
- Preview and proofread: Before sending your design to print, it’s crucial to preview and proofread it thoroughly. Use Canva’s preview and zoom-in feature to check for any pixelation or imperfections. Proofread the text for spelling or grammatical errors and make sure that the design looks as intended.
By following these tips and utilizing Canva’s tools and features, you can optimize the print quality of your designs and ensure that they are ready for professional printing.
Understanding the PDF print option
When saving your designs in Canva for printing purposes, the PDF format is often the preferred choice. PDF files offer several advantages for print, including:
- Preserving the design layout: PDF files retain the layout and formatting of your design, ensuring that it appears as intended on different devices and platforms. This is particularly important when sharing the design with professional printers or print shops.
- Embedding fonts: PDF files allow for embedding fonts, which ensures that the design is displayed correctly even if the recipient does not have the specific fonts installed on their system. This is crucial for maintaining the integrity of your design, especially when using custom or unique fonts.
- Compatibility with printing software: PDF files are compatible with most printing software and devices, making it easy to send your design for professional printing. Printers often prefer PDF files because they preserve the quality and accuracy of the design during the printing process.
When saving your design as a PDF in Canva, consider the print settings and requirements of your specific project. Canva provides options to include crop marks, bleed, and other print-related settings to ensure that your design is ready for professional printing.
Saving Your Design as a Template in Canva
What is a Canva template
A Canva template is a pre-designed layout that serves as a starting point for your design projects. Templates can be customized to fit your specific needs and can save you time and effort by providing a structure and design elements to work with. Canva offers a vast collection of templates for various purposes, such as social media graphics, presentations, posters, and more.
Templates in Canva can be a valuable resource, especially if you frequently create similar types of designs or if you want to maintain consistency across your projects. They provide a foundation for your design and can inspire new ideas and creative approaches.
How to create a template in Canva
Creating a template in Canva is a simple process. Here’s how you can create your own template:
- Start a new design project in Canva or open an existing design that you want to use as a template.
- Customize the design by adding your own content, adjusting colors and fonts, and rearranging elements to suit your desired layout.
- Once you are satisfied with the design, click on the Publish/Download button to open the publishing menu.
- Within the publishing menu, click on the “Create a template” option. Canva will prompt you to enter a name for your template.
- After entering the name, click on the “Save template” button. Your design will be saved as a template in your Canva account.
By creating and saving your own templates in Canva, you can streamline your design process and ensure consistency across your projects. Templates can be easily accessed from your Canva dashboard, allowing you to reuse and modify them as needed.
Benefits of having templates
Having templates in Canva provides several benefits:
- Time-saving: Templates eliminate the need to start from scratch for each design project. They provide a starting point with a pre-designed layout that can be customized to fit your needs. This saves time and effort, especially when working on designs with similar structures or elements.
- Consistency: Templates help maintain consistency across your design projects. By using templates, you can establish a consistent visual style, branding, or layout. This ensures that your designs have a cohesive look and feel, reinforcing your brand identity.
- Efficiency: Templates streamline the design process by providing structure and design elements. This can increase efficiency and productivity, as you don’t need to recreate common elements from scratch each time. By using templates, you can focus on customizing and refining specific aspects of your design, rather than starting from square one.
- Collaboration: Templates can facilitate collaboration when working with teams or clients. By using templates, you provide a consistent framework that can be easily shared and modified by multiple individuals. This facilitates teamwork and ensures that everyone involved is working within the same design framework.
By leveraging the benefits of templates, you can enhance your design workflow, save time, and maintain consistency across your projects in Canva.
Conclusion
Saving your Canva projects properly is crucial for preserving your work and ensuring easy accessibility. Canva offers a user-friendly platform with a multitude of tools and features that can help you create professional-looking designs. By familiarizing yourself with the Canva interface, exploring the available tools and features, and utilizing the save and share options effectively, you can optimize your design workflow and achieve your creative goals.
Canva provides a powerful and convenient solution for individuals and teams looking to create visually appealing designs without the need for extensive design skills or costly software. With its extensive library of templates, customizable elements, collaboration options, and printing capabilities, Canva empowers users to express their ideas, unleash their creativity, and achieve their design objectives.
By utilizing Canva to its full potential, you can unlock endless possibilities for your design projects. We encourage you to further explore Canva’s features and functions, experiment with different templates and design elements, and continue to enhance your design skills. With Canva, the world of design is at your fingertips.